
Table of Contents
Helvetiny85 Tutorials
Hier findet Ihr Beispiele/Tutorials welche den Helvetiny85 und den Helvetiny85 3.3V in der Anwendung zeigen.
Achtung bei der Anwendung je nach Model folgendes beachten:
Helvetiny85
Da der Helvetiny85 am USB Port vom Computer hängt sind die Pins BP3 und BP4 nur mit Einschränkungen zu verwenden. An beiden Pins hängt je eine 3.6 Volt Zehner Diode. Zudem ist am BP3 ein Widerstand mit VCC verbunden. Die Pins BP0, BP1 und BP2 sind somit die erste Wahl und sollten vorwiegend genutzt werden.
Helvetiny85 3.3 Volt
Im Gegensatz zu seinem Vorgänger besitzt der Helvetiny85 3.3 Volt zwei Brücken um die Pins BP3 und BP4 wahlweise mit dem USB Port oder mit dem Steckbrett/Board zu verbinden. Daher ist die Nutzung dieser Pins kein Problem mehr. Jedoch sollten die Brücken natürlich immer in der richtigen Stellung stehen.
Led Pixel
Ein Led Pixel ist eine ganz tolle Sache. Damit kann man mit wenig Bauteilen viele Effekte erstellen. Mit dem Helvetiny85 ist es einfach möglich LedPixel anzusteuern. In unserem Beispiel haben wir einen Led Pixel angeschlossen. VCC und GND an die dafür vorgesehen Anschlüsse und D-IN an BP0 (D0).
Um das ganze etwas interessanter zu machen, verwenden wir hier auch noch ein Potentiometer. Damit kann die Farbe vom Led Pixel gesteuert werden. Das Potentiometer wird wie im Beispiel vorher an BP2 (A1) angeschlossen.
Wir verwenden die Adafruit Neopixel Library. Die kann in der Arduino IDE sehr einfach über den Library Manager installiert werden.
/*
 LedPixel Programm Example Helvetiny85
*/

#include <Adafruit_NeoPixel.h>

#define PIN 0 // on tiny85 BP0

// Parameter 1 = number of pixels in strip
// Parameter 2 = Arduino pin number (most are valid)
// Parameter 3 = pixel type flags, add together as needed:
// NEO_KHZ800 800 KHz bitstream (most NeoPixel products w/WS2812 LEDs)
// NEO_KHZ400 400 KHz (classic 'v1' (not v2) FLORA pixels, WS2811 drivers)
// NEO_GRB Pixels are wired for GRB bitstream (most NeoPixel products)
// NEO_RGB Pixels are wired for RGB bitstream (v1 FLORA pixels, not v2)
Adafruit_NeoPixel strip = Adafruit_NeoPixel(1, PIN, NEO_GRB + NEO_KHZ800);

// IMPORTANT: To reduce NeoPixel burnout risk, add 1000 uF capacitor across
// pixel power leads, add 300 - 500 Ohm resistor on first pixel's data input
// and minimize distance between Arduino and first pixel. Avoid connecting
// on a live circuit...if you must, connect GND first.

int Brightness = 20;
int Speed = 50;
int sensorPin = A1;
int sensorValue = 0;

void setup() {
  delay(500);
  strip.begin();
  strip.show();
}

void loop() {

  sensorValue = analogRead(sensorPin);
  int a = map(sensorValue,0,1023,0,255);
  strip.setPixelColor(0, Wheel((a)));
  strip.setBrightness(Brightness);
  strip.show();
  delay(Speed);

}

// Input a value 0 to 255 to get a color value.
// The colours are a transition r - g - b - back to r.
uint32_t Wheel(byte WheelPos) {
  if(WheelPos < 85) {
   return strip.Color(WheelPos * 3, 255 - WheelPos * 3, 0);
  } else if(WheelPos < 170) {
   WheelPos -= 85;
   return strip.Color(255 - WheelPos * 3, 0, WheelPos * 3);
  } else {
   WheelPos -= 170;
   return strip.Color(0, WheelPos * 3, 255 - WheelPos * 3);
  }
}
Taster steuert Led (Loop/Interupt)
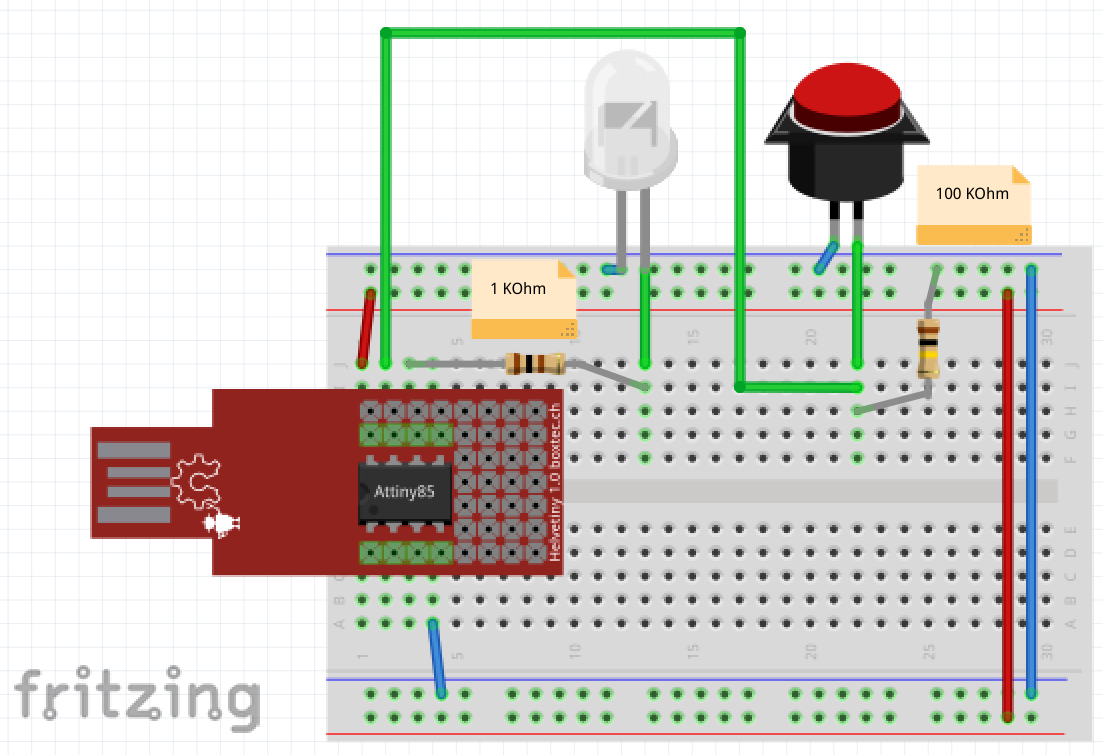
Jetzt möchten wir eine Led mit einem Taster steuern. Dafür gibt es zwei Möglichkeiten. Wir können im Hauptprogramm im Loop immer prüfen ob die Taste gedrückt wurde und dann darauf reagieren. Das funktioniert natürlich hat aber einen nachteil. Wenn nämlich das Programm noch andere Dinge tun muss und nicht genau in dem Zeitpunkt bei der Überprüfung vom Taster vorbeikommt, dann kann es vorkommen dass eine Betätigung vom Taster nicht erkannt wird.
Dafür gibt es die Interupts. Diese unterbrechen den normalen Programmablauf und springen direkt in die Interupt routine.
Hier der Aufbau.
Das erste Coding macht den nicht Idealen Weg über den Loop im Hauptprogramm. Wenn ihr die Zeile delay(500); aktiviert seht ihr, das beim testen gewisse Tastendrücke untergehen weil das Hauptprogramm beschäftigt ist.
const int buttonPin = 0;
const int ledPin = 1;

int ledState = HIGH;
int buttonState;
int lastButtonState = LOW;

void setup() {
  pinMode(buttonPin, INPUT);
  pinMode(ledPin, OUTPUT);
  digitalWrite(ledPin, HIGH);
  delay(200);
  digitalWrite(ledPin, LOW);
  delay(200);
  digitalWrite(ledPin, HIGH);
  delay(200);
  digitalWrite(ledPin, LOW);
  delay(200);
}

void loop() {

// Activate this delay in order to see we will miss sometimes the button
//delay(500);

  int reading = digitalRead(buttonPin);
    if (reading != buttonState) {
      buttonState = reading;
      if (buttonState == HIGH) {
       ledState = !ledState;
      }
    }
  digitalWrite(ledPin, ledState);
  lastButtonState = reading;
}
Das Coding hier nutzt den Interupt
const byte interruptPin = 0;
const byte ledPin = 1;
boolean ledlevel = LOW;
//boolean ledlevellast = LOW;
//static unsigned long last_interrupt_time = 0;

void setup() {

    GIMSK = 0b00100000;    // turns on pin change interrupt
    PCMSK = 0b00000001;    // turn on interrupts on pins PB0
//    sei();

  pinMode(ledPin, OUTPUT);

  digitalWrite(ledPin, HIGH);
  delay(200);
  digitalWrite(ledPin, LOW);
  delay(200);
  digitalWrite(ledPin, HIGH);
  delay(200);
  digitalWrite(ledPin, LOW);
  delay(200);
}

void loop() {

// Activate this delay in order to see we will miss sometimes the button
delay(500);

}

ISR(PCINT0_vect){
if(ledlevel){
    ledlevel = LOW;
  } else {
    ledlevel = HIGH;
  }
  digitalWrite(ledPin, ledlevel);
}
Sound Generator
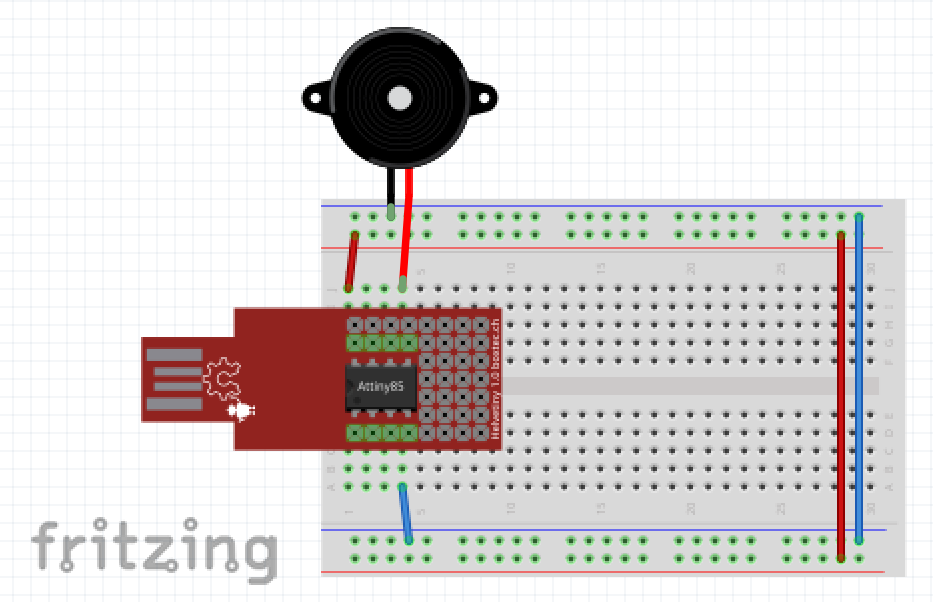
Ein Piezo Element ist nicht teuer und bringt sofort Spass. Alternativ kann auch ein kleiner Lautsprecher benutzt werden. Weil damit können wir sehr einfach Töne erzeugen.
Dazu verbinden wir das Piezo Element mit GND und Pin D0.
Hier das zugehörige sehr einfache Programm um einen Ton zu erzeugen:
/*
  Helvetiny85 Piezo Sound
*/

const int ledPin =  1;
const int piezoPin = 0;
const long interval = 1000;
int ledState = LOW;
unsigned long previousMillis = 0

void setup() {
  // set the digital pin as output:
  pinMode(ledPin, OUTPUT);
  pinMode(piezoPin, OUTPUT);

}

void loop() {
  unsigned long currentMillis = millis();

  if (currentMillis - previousMillis >= interval) {
    previousMillis = currentMillis;

    if (ledState == LOW) {
      ledState = HIGH;
      tone(piezoPin, 2000);
    } else {
      ledState = LOW;
      noTone(piezoPin);
    }

    digitalWrite(ledPin, ledState);
  }
}
Hier eine Melodie, dazu werden die Einzelnen Töne und deren Länge jeweils als Array definiert und dann abgespielt.
/*
  Helvetiny85 Piezo Sound 2 Melody
*/

#include "pitches.h"

const int piezoPin = 0;

// notes in the melody:
int melody[] = {
  NOTE_C2, NOTE_F3, NOTE_C3, NOTE_A2,
  NOTE_C3, NOTE_F3, NOTE_C3,
  NOTE_C3, NOTE_F3, NOTE_C3, NOTE_F3,
  NOTE_AS3, NOTE_G3, NOTE_F3, NOTE_E3, NOTE_D3, NOTE_CS3,
  NOTE_C3, NOTE_F3, NOTE_C3, NOTE_A2, // the same again
  NOTE_C3, NOTE_F3, NOTE_C3,
  NOTE_AS3, 0, NOTE_G3, NOTE_F3,
  NOTE_E3, NOTE_D3, NOTE_CS3, NOTE_C3};

int MAX_COUNT = sizeof(melody) / 2; // Melody length, for looping.

// note durations: 4 = quarter note, 8 = eighth note, etc.:
int noteDurations[] = {
  4,    4,    4,    4,
  4,    4,          2,
  4,    4,    4,    4,
  3,   8, 8, 8, 8, 8,
  4,    4,    4,    4, // the same again
  4,    4,          2,
  4, 8, 8,    4,    4,
  4,    4,    4,    4, 0};

void setup() {
  pinMode(piezoPin, OUTPUT);
}

void loop() {

  // iterate over the notes of the melody:
  for (int thisNote = 0; thisNote < MAX_COUNT; thisNote++) {

    // to calculate the note duration, take one second divided by the note type.
    //e.g. quarter note = 1000 / 4, eighth note = 1000/8, etc.
    int noteDuration = 1000 / noteDurations[thisNote];
    tone(piezoPin, melody[thisNote], noteDuration);

    // to distinguish the notes, set a minimum time between them.
    // the note's duration + 30% seems to work well:
    int pauseBetweenNotes = noteDuration * 1.30;
    delay(pauseBetweenNotes);
    // stop the tone playing:
    noTone(piezoPin);
  }

}
Sound Generator & Poti
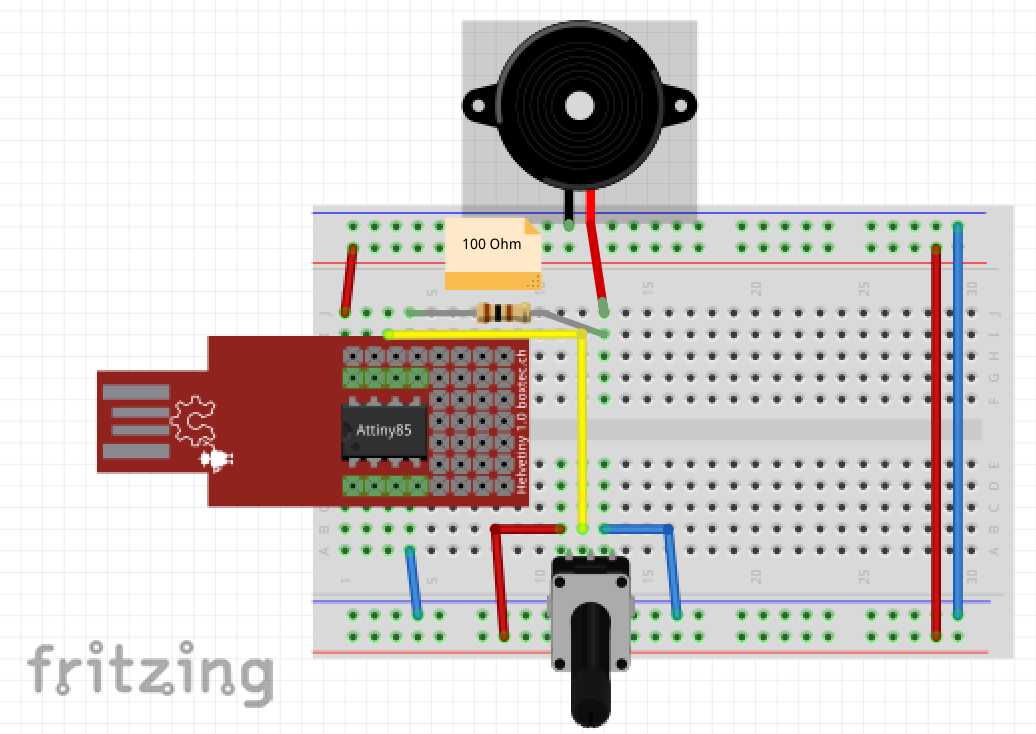
Damit wir die Töne selber steuern können schliessen wir zusätzlich zum Piezo noch ein Poti an. Der Piezo auf D0 und das Poti zwischen GND und VCC an A1.
Der Programmcode bietet noch nicht viel, über das Poti lässt sich die Tonhöhe auswählen.
/*
  Helvetiny85 Piezo Sound 3 with Poti
*/

const int piezoPin = 0;
const int sensorPin = A1;
int sensorValue = 0;

void setup() {
  pinMode(piezoPin, OUTPUT);
  pinMode(sensorPin, INPUT);
}

void loop() {
  sensorValue = analogRead(sensorPin);
  sensorValue = map(sensorValue,0,1023,35,4900);

 int noteDuration = 1000 / 4;
 tone(piezoPin, sensorValue, noteDuration);
 int pauseBetweenNotes = noteDuration * 1.30;
 delay(pauseBetweenNotes);

}
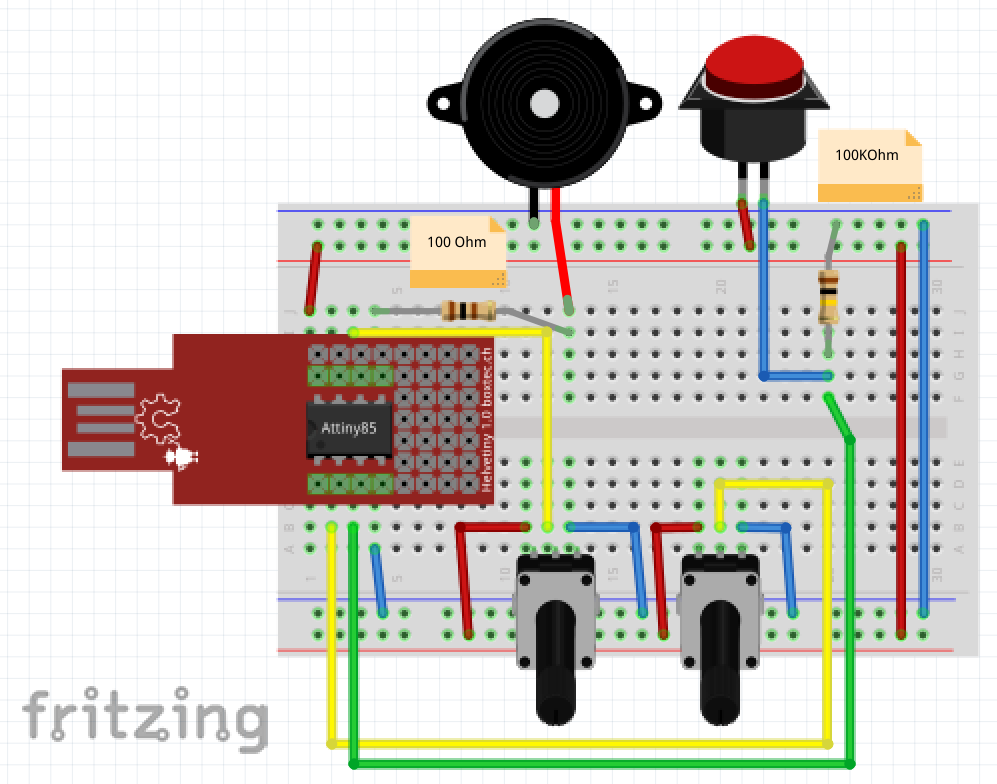
Sound Kontrolle mit zwei Potis
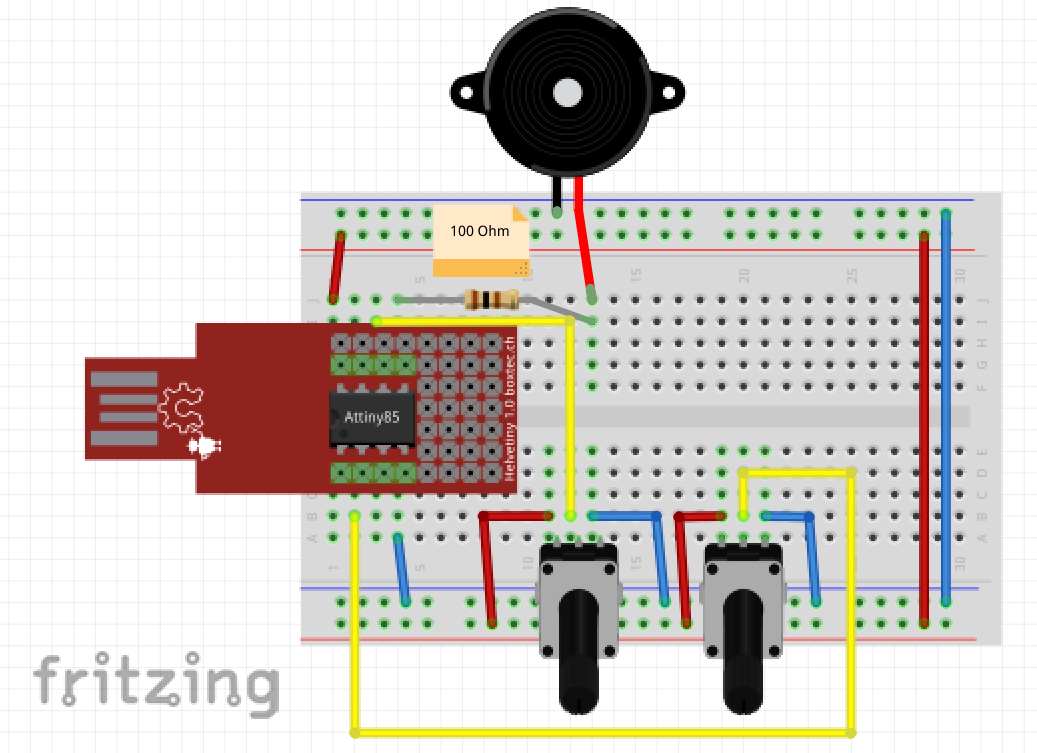
Damit wir die Länge und die Tonhöhe kontrollieren können schliessen wir noch ein zweites Potentiometer an.
Jetzt können wir den Ton und die Länge kontrollieren:
/*
  Helvetiny85 Piezo Sound 4 with 2 Potis
*/

const int piezoPin = 0;
const int sensorPin1 = A1;
const int sensorPin2 = A3;
int sensorValue1 = 0;
int sensorValue2 = 0;
int noteDuration = 0;
int note= 0;

void setup() {
  pinMode(piezoPin, OUTPUT);
  pinMode(sensorPin1, INPUT);
  pinMode(sensorPin2, INPUT);
}

void loop() {
  sensorValue1 = analogRead(sensorPin1);
  note = map(sensorValue1,0,1023,35,4900);
  sensorValue2 = analogRead(sensorPin2);
  noteDuration = map(sensorValue2,0,1023,125,1000);

 tone(piezoPin, sensorValue1, noteDuration);
 int pauseBetweenNotes = noteDuration * 1.30;
 delay(pauseBetweenNotes);

}
Sound Kontrolle mit zwei Potis und einem Taster
Damit wir unserem Helvetiny85 etwas Musik beibringen können brauchen wir dazu noch einen Taster. Dieser schliessen wir über einen 100KOhm Widerstand auf A2 an.
Der Piezo al Klopf Sensor
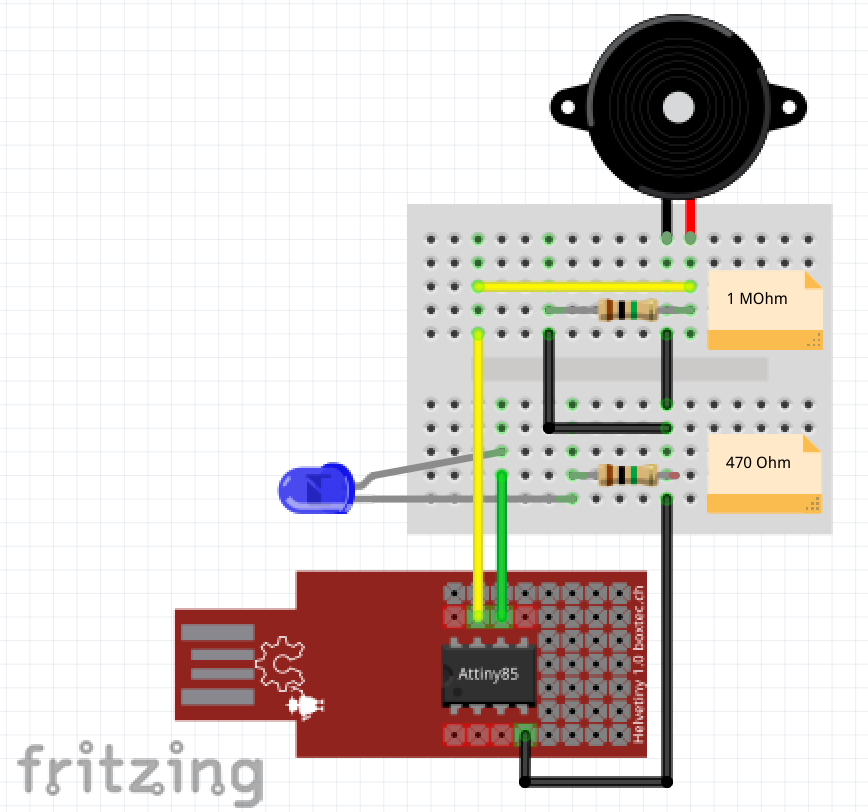
Ein Piezo kann nicht nur Töne erzeugen sondern auch als Sensor. Dis Schallwellen werden in elektrische Impulse umgeleitet. Diese Elektrischen Impulse können wir mit dem Helvetiny messen, und darauf reagieren.
Zum Aufbau brauchen wir einen Piezo, einen 1 MOhm Widerstand und eine Z-Diode zur Sicherheit. Die Z-Diode stellt sicher, dass eine hohe Spannung nicht den Helvetiny85 zerstört.
Der Aufbau:
Das Coding:
/*
  Klopf Sensor mit Piezo
  Piezo an A1
  Led an D1
*/

const int ledPin = 1;
const int PiezoPin = A1;
const int diff = 100; // sensibilität

int sensor = 0;
int ledState = LOW;

void setup() {
  pinMode(ledPin, OUTPUT); // declare the ledPin as as OUTPUT

  digitalWrite(ledPin, HIGH);
  delay(200);
  digitalWrite(ledPin, LOW);
  delay(200);
  digitalWrite(ledPin, HIGH);
  delay(200);
  digitalWrite(ledPin, LOW);
  delay(200);
}

void loop() {
  sensor = analogRead(PiezoPin);
  if (sensor >= diff) {
    ledState = !ledState;
    digitalWrite(ledPin, ledState);
  }
  delay(200); // Wartezeit um den Analog Read Buffer nicht zu überfüllen
}
I2C Scanner
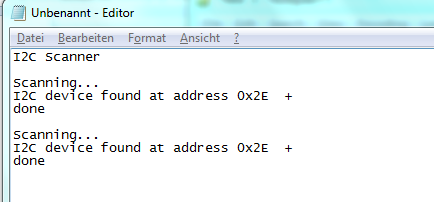
Der I2C Scanner ist sehr hilfreich um zu sehen ob die I2C Komponente sauber am IC angeschlossen ist und die Kommunikation funktioniert. Zudem ist es wichtig um die I2C Adresse der Komponente zu ermitteln.
I2C an Helvetiny85:
- Pin 5 PB0 (SDA/DAT)
- Pin 7 PB2 (SCL/CLK)
Das Coding stammt von den Digispark Beispielen. Es scannt den I2C Bus und gibt das Protokoll als Tastatureingaben aus. Wir Übertragen das Programm und öffnen auf dem Computer einen Text Editor. Dann schreibt uns der Helvetiny85 wie eine Tastatur das Protokoll in den Text Editor.
Hier das Coding:
// --------------------------------------
// i2c_scanner
//
// This sketch tests the standard 7-bit addresses
// Devices with higher bit address might not be seen properly.
//
#include <Wire.h>
#include <DigiKeyboard.h>

void setup()
{

  Wire.begin();
  DigiKeyboard.delay(3000);

  DigiKeyboard.println("\nI2C Scanner");
}


void loop()
{
  byte error, address;
  int nDevices;

  DigiKeyboard.println("Scanning...");

  nDevices = 0;
  for (address = 1; address < 127; address++ )
  {
    // The i2c_scanner uses the return value of
    // the Write.endTransmisstion to see if
    // a device did acknowledge to the address.
    Wire.beginTransmission(address);
    error = Wire.endTransmission();

    if (error == 0)
    {
      DigiKeyboard.print("I2C device found at address 0x");
      if (address < 16)
        DigiKeyboard.print("0");
      DigiKeyboard.print(address, HEX);
      DigiKeyboard.println("  !");

      nDevices++;
    }
    else if (error == 4)
    {
      DigiKeyboard.print("Unknow error at address 0x");
      if (address < 16)
        DigiKeyboard.print("0");
      DigiKeyboard.println(address, HEX);
    }
  }
  if (nDevices == 0)
    DigiKeyboard.println("No I2C devices found\n");
  else
    DigiKeyboard.println("done\n");

  DigiKeyboard.delay(5000);           // wait 5 seconds for next scan
}
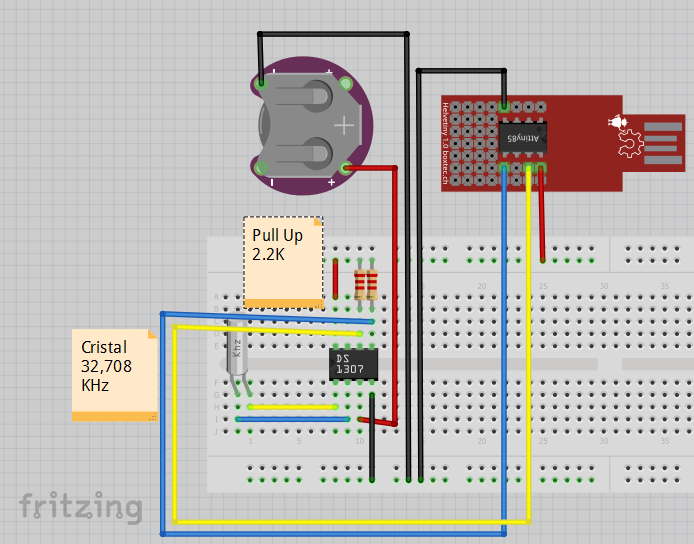
RTC DS1307 Uhr I2C
Der Realtime Clock IC DS1307 wird auch per I2C angeschlossen. Um die Verbindung zu prüfen laden wir zuerst den I2C Scanner auf das Board. Der Scanner meldet eine Komponente mit der 0x68 gefunden zu haben. Das ist unser DS1307 IC, somit wird der sauber erkannt.
Wichtig hier zum Anschluss vom DS1307 (http://shop.boxtec.ch/ds1307-rtc-p-40363.html) ist die 3 Volt Batterie, der Quarz (http://shop.boxtec.ch/32786khz-6pf-passiv-quarz-p-41059.html) und auch wieder die Pullup Widerstände.
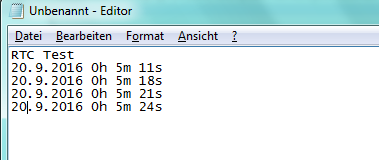
Das Beispiel nutzt die TinyRTCLib und die DigiKeyboard Library um die Zeit per Keyboard an den Computer zu übermitteln. Hier die Ausgabe:
Hier das Coding:
// Date and time functions using a DS1307 RTC connected via I2C and Wire lib

#include <TinyWireM.h>
#include "TinyRTClib.h"
#include <DigiKeyboard.h>

RTC_DS1307 RTC;
#define KEYCODE_MOD_DEL 0x3A

void setup () {
  DigiKeyboard.delay(3000);
  DigiKeyboard.println("\nRTC Test");
    TinyWireM.begin();
    RTC.begin();

  if (! RTC.isrunning()) {
    DigiKeyboard.println("RTC is NOT running!");
    // following line sets the RTC to the date & time this sketch was compiled
    RTC.adjust(DateTime(__DATE__, __TIME__));
    DigiKeyboard.println("RTC set date and time!");
  }
}

void loop () {
    DateTime now = RTC.now();

    DigiKeyboard.print(now.day(), DEC);
    DigiKeyboard.print(".");
    DigiKeyboard.print(now.month(), DEC);
    DigiKeyboard.print(".");
    DigiKeyboard.print(now.year(), DEC);
    DigiKeyboard.print(" ");
    DigiKeyboard.print(now.hour(), DEC);
    DigiKeyboard.print("h ");
    DigiKeyboard.print(now.minute(), DEC);
    DigiKeyboard.print("m ");
    DigiKeyboard.print(now.second(), DEC);
    DigiKeyboard.println("s");

    delay(3000);
}
I2C Resistor
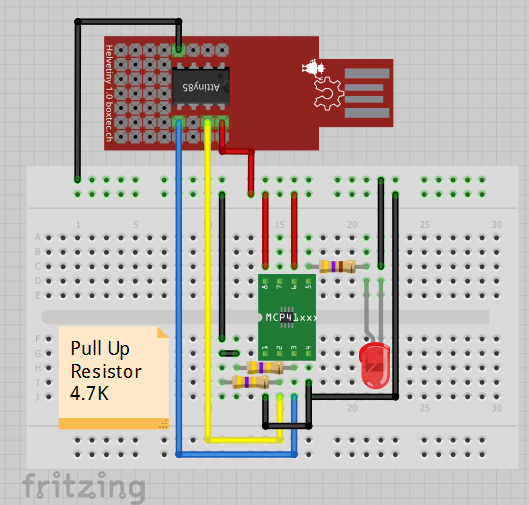
Der Helvetiny85 kann auch mit I2C kommunizieren. Hier als Beispiel ein digitales Potentiometer (http://shop.boxtec.ch/digital-potentiometer-i2c-10k-mcp4531-103e-p-41307.html). Wichtig: der Attiny85 hat für die I2C Ports keine Pullup Widerstände. Die Pullup Widerstände müssen also in jedem Fall, auch bei sehr kurzen Leitungen eingebaut werden. Um das Ergebnis zur prüfen ist eine Led über das Potentiometer angeschlossen. Damit kann geprüft werden ob sich der Widerstand auch wirklich ändert.
I2C an Helvetiny85:
- Pin 5 PB0 (SDA)
- Pin 7 PB2 (SCL)
Das Programm steuert das digitale Potentiometer über I2C an und blinkt damit LED.
// I2C Digital Potentiometer on Attiny85
//
// Connection:
//
//          MCP4531           Helvetiny85
//          1                 GND
//          2                 PB2 (SCL)
//          3                 PB0 (SDA)
//          4                 GND
//          5,6,7 (Poti)
//          8                 VCC (5V or 3.3V)

#include <TinyWireM.h>                  // I2C Master lib for ATTinys which use USI

int ledState = LOW;
int potival = 0;
unsigned long previousMillis = 0;
const long interval = 100;

void setup() {
  TinyWireM.begin();
}

void loop() {

  unsigned long currentMillis = millis();

  if(currentMillis - previousMillis >= interval) {
    // save the last time you blinked the LED
    previousMillis = currentMillis;

    // if the LED is off turn it on and vice-versa:
    if (ledState == LOW){
      ledState = HIGH;
      potival = 0; }
    else {
      ledState = LOW;
      potival = 127;}

// Send
  TinyWireM.beginTransmission(0x2E);
  TinyWireM.send(0x00);
  TinyWireM.send(potival);
  TinyWireM.endTransmission();

  }

}
I2C 8x8 Led Matrix von Adafruit
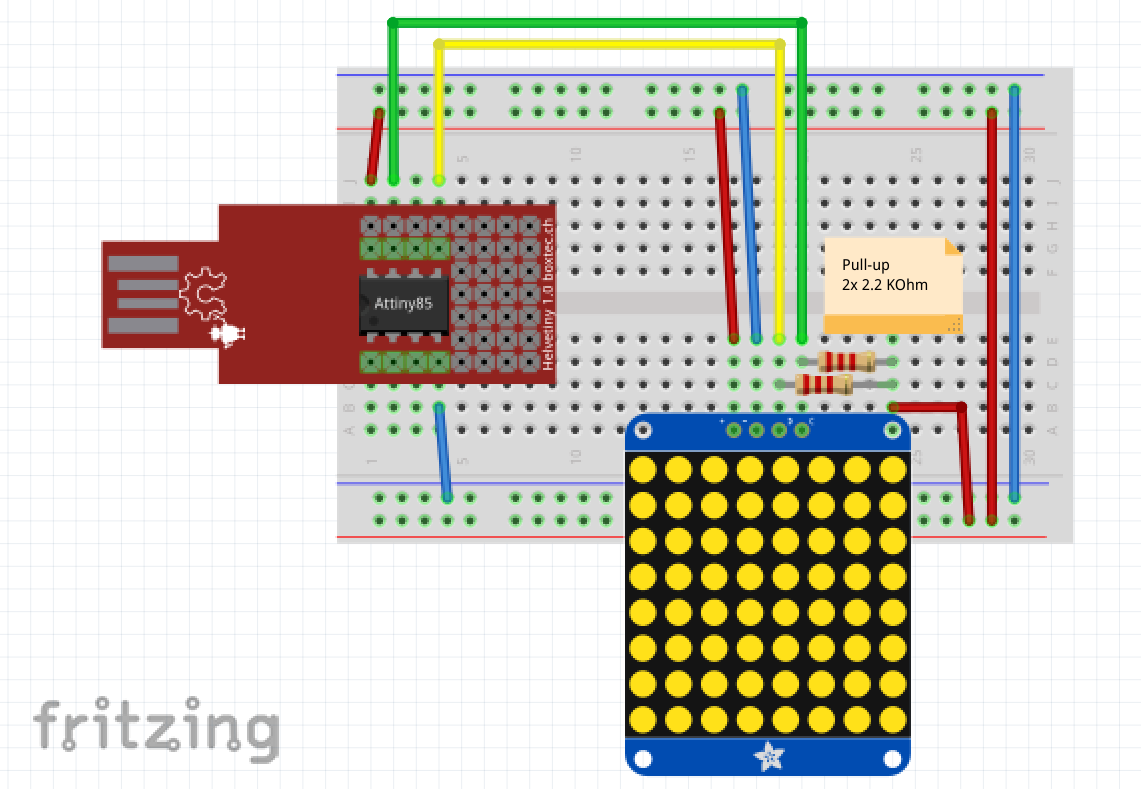
Die 8×8 Led Matrix von Adafruit (http://shop.boxtec.ch/mini-8x8-led-matrix-mit-i2c-backpack-gruen-p-42155.html) ist ein tolles Bauelement um etwas spielerisches zu machen. Sie lässt sich auch via I2C anschliessen. Wichtig: die beiden I2C Anschlüsse müssen durch Pull-up Widerstände (2.2 KOhm) abgeschlossen werden.
I2C 8×8 Matrix an Helvetiny85:
- Pin 5 PB0 (SDA) an D with 2k2 pull up resistor
- Pin 7 PB2 (SCL) an C with 2k2 pull up resistor
- VCC an +
- GND an -
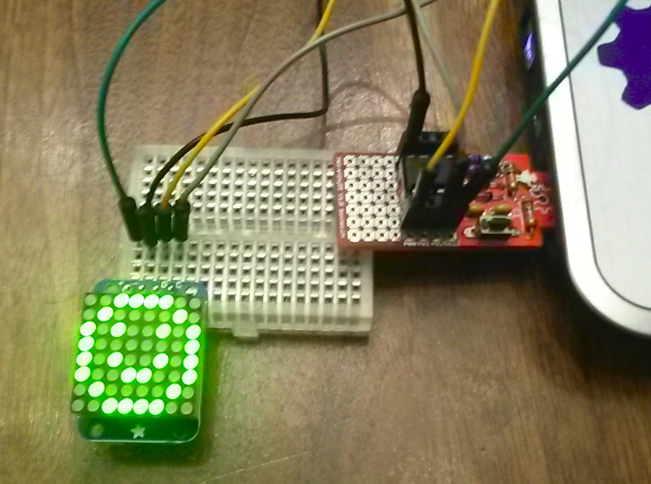
Das Programm zeigt einen animierten Smiley an.
/*
 *  Helvetiny85 8x8 Led Smiley
*/
#include <TinyWireM.h>

#define i2c_addr 0x70 // address for Adafruit 7-segment LED backpack

byte
  smile_bmp[8] =
  { B00111100,
    B01000010,
    B10100101,
    B10000001,
    B10100101,
    B10011001,
    B01000010,
    B00111100 },
  neutral_bmp[] =
  { B00111100,
    B01000010,
    B10100101,
    B10000001,
    B10111101,
    B10000001,
    B01000010,
    B00111100 },
  frown_bmp[] =
  { B00111100,
    B01000010,
    B10100101,
    B10000001,
    B10011001,
    B10100101,
    B01000010,
    B00111100 };

void setup() {

// Init
  TinyWireM.begin();
  TinyWireM.beginTransmission(i2c_addr);
  TinyWireM.send(0x21);  // turn on oscillator
  TinyWireM.endTransmission();
  delay(100);

// on
   TinyWireM.beginTransmission(i2c_addr);
   TinyWireM.send(0x81); // position of colon
   TinyWireM.endTransmission(); // push data to display
   delay(100);

}

// Main Loop
void loop(){

show_bmp( smile_bmp );
delay(1000);
show_bmp( neutral_bmp );
delay(1000);
show_bmp( frown_bmp );
delay(1000);

} // Loop

// show the bmp
void show_bmp( byte bmp[] ){
byte datax;
TinyWireM.beginTransmission(i2c_addr);
for( int x = 0; x < 8; x++){
  datax = shift_reverse( bmp[x] );
  TinyWireM.send(0x00); // start at address 0x00
  TinyWireM.send(datax); // position of colon
}
TinyWireM.endTransmission(); // push data to display

}

// Shift one bit left and mirror it
byte shift_reverse(byte x){
     x = (x << 1) | (x >> (8 - 1));
    x = (((x&0xaa)>>1)|((x&0x55)<<1));
    x = (((x&0xcc)>>2)|((x& 0x33)<<2));
    return((x>>4)|(x<<4));
}
Temperatur Kontrolle mit NTC und Ventilator (LED)
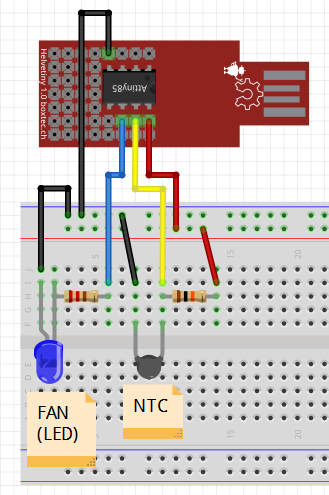
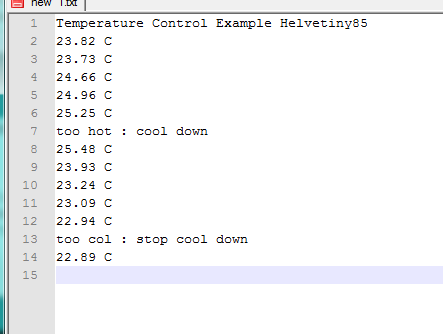
Hie ein kleines Beispiel um die Temperatur mit einem NTC (10K) Widerstand zu messen. Wenn die Temperatur zu hoch ist wird eine Ventilator(LED) eingeschaltet, wenn die Temperatur wieder sinkt wird der Ventilator(LED) wieder ausgeschaltet. Das Programm gibt auch noch ein Protokoll auf dem PC an. Dazu nutzen wir die DigiKeyboard Bibliothek, wir müssen einfach ein Texteditor öffnen dann schreibt der Helvetiny85 schon sein Protokoll.
Hier der Anschlussplan:
Hier das Protokoll in einem Texteditor:
/*
  Temperature Control Example Helvetiny85
  Connect a 10K NTC with a 10K Resistor to BP2(A1) and a Led to BP1
  The Helvetiny controls the temperature, if it's too hot he activates a Fan(Led)
  Protocol comes via Digikeyboard on the computer
 */
 #include <DigiKeyboard.h>

// Temperature Termistor
    // which analog pin to connect
    #define THERMISTORPIN1 A1
    // resistance at 25 degrees C
    #define THERMISTORNOMINAL 10000
    // temp. for nominal resistance (almost always 25 C)
    #define TEMPERATURENOMINAL 25
    // how many samples to take and average, more takes longer
    // but is more 'smooth'
    #define NUMSAMPLES 3
    // The beta coefficient of the thermistor (usually 3000-4000)
    #define BCOEFFICIENT 3950
    // the value of the 'other' resistor
    #define SERIESRESISTOR 10000
    // the value of the Fan/Led Pin
    # define FanPin 1

    boolean FanState;
    float tempresult;
    int samples1[NUMSAMPLES];
    int i;

void setup() {
    pinMode(FanPin, OUTPUT);
    DigiKeyboard.delay(3000);
    DigiKeyboard.println("Temperature Control Example Helvetinz85");
}

void loop() {

// Termistor Read
    for (i=0; i< NUMSAMPLES; i++) {
    samples1[i] = analogRead(THERMISTORPIN1);
    delay(50);
    }
    // average all the samples out
    tempresult = 0;
    for (i=0; i< NUMSAMPLES; i++) {
    tempresult += samples1[i];
    }
    tempresult /= NUMSAMPLES;

    tempresult = 1023 / tempresult - 1;
    tempresult = SERIESRESISTOR / tempresult;
    tempresult = tempresult / THERMISTORNOMINAL; // (R/Ro)
    tempresult = log(tempresult); // ln(R/Ro)
    tempresult /= BCOEFFICIENT; // 1/B * ln(R/Ro)
    tempresult += 1.0 / (TEMPERATURENOMINAL + 273.15); // + (1/To)
    tempresult = 1.0 / tempresult; // Invert
    tempresult -= 273.15; // convert to C

    DigiKeyboard.print(tempresult);
    DigiKeyboard.println(" C");

if (tempresult > 25 && FanState == LOW ){
      DigiKeyboard.println("too hot > cool down with fan");
      FanState = HIGH;
      digitalWrite(FanPin, FanState);
}

if (tempresult < 23 && FanState == HIGH){
      DigiKeyboard.println("too cold > stop cooling down with fan");
      FanState = LOW;
      digitalWrite(FanPin, FanState);
}
  delay(3000);
}
Bluetooth HC-05 Kommunikation
Das Bluetooth Modul HC-05 ist ein sehr kleines und preiswertes Modul. Hier verwenden wir es in Verbindung mit dem Helvetiny85. Der Helvetiny85 kann mit der SoftwareSerial Bibliothek mit dem Bluetooth Modul kommunizieren. Unser Bluetooth Modul ist bereits vorbereitet. Falls nicht gibt es hier weitere Informationen.
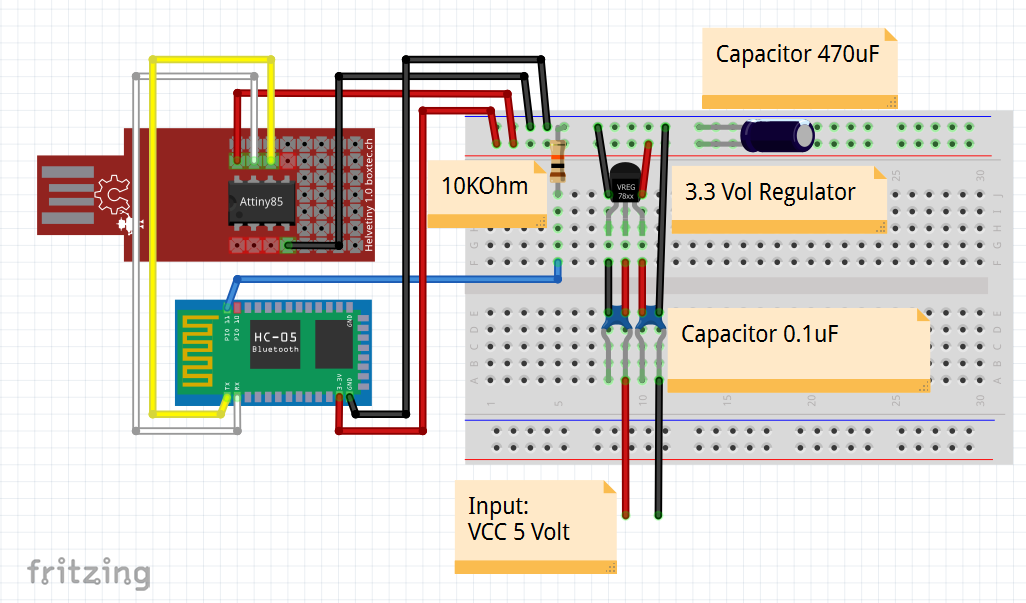
Das Bluetooth Modul kann nur mit 3.3 Volt umgehen, der Helvetiny85 hat aufgrund vom USB Anschluss jedoch 5 Volt. Um auf 3.3 Volt zu kommen gibt es zwei Möglichkeiten entweder der Helvetiny85 wird direkt mit 3.3 Volt betrieben oder die Anschlüsse von RX,TX werden über einen Pegelkonverter geführt. Ich habe mich entschieden den Helvetiny85 direkt mit 3.3 Volt zu versorgen und nicht im USB Anschluss zu betreiben. Je nach Spannungsversorgung macht es noch Sinn einen grösseren Kondensator dazwischen zu schalten. Nur über USB kann es vorkommen, dass das Bluetooth Modul kurzzeitig zu viel Strom verbraucht und die Spannung abfällt. Das kann zu einem Reset vom Bluetooth Modul oder vom Helvetiny85 führen.
Anschlussbelegung:
//--------------------------------------------------
// Helvetiny85 & HC-05 Bluetooth Module & Serial Test
// Connection
//              Helvetiny85           HC-05
//              PB0 (Led)
//              PB1 (1)               Tx
//              PB2 (2)               Rx
//              VCC                   VCC
//              GND                   GND
//--------------------------------------------------
Aufbau:
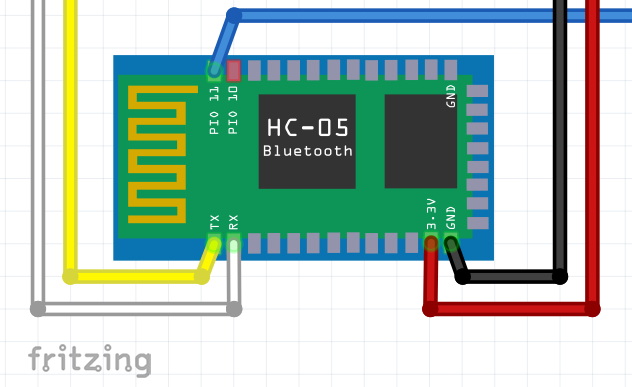
Detail HC-05 Modul:
Hier das Testprogramm, es reagiert auf eine Meldung welche der Benutzer über ein Bluetooth Terminal absenden kann. Diese Meldung wird im Helvetiny85 empfangen und wieder zurück an den Absender gesendet.
#define RxD 1
#define TxD 2

#include <SoftSerial.h>
#include <TinyPinChange.h>

SoftSerial blueToothSerial(RxD,TxD); // RX 1, TX 2

int ledState = LOW;
const int LED_IR_PF = 0;
uint8_t VirtualPortNb;
volatile byte p = 0;
String inputString = "";
String inputString2 = "";
boolean stringComplete = false;

unsigned long previousMillis = 0;        // will store last time LED was updated
const long interval = 3000;           // interval at which to blink (milliseconds)

void setup() {

  pinMode(RxD, INPUT);
  pinMode(TxD, OUTPUT);
  delay(500);

  blueToothSerial.begin(57600); //Set Bluetooth BaudRate
  pinMode(LED_IR_PF, OUTPUT);
  delay(400);
  blueToothSerial.print("Helvetiny Bluetooth ready\r\n");

}

void loop() {
  unsigned long currentMillis = millis();

  if (currentMillis - previousMillis >= interval) {
    // save the last time you blinked the LED
    previousMillis = currentMillis;

  blueToothSerial.print("Millis: \r\n");
  blueToothSerial.print(currentMillis);
  blueToothSerial.print(" readed: \r\n");
  blueToothSerial.print(inputString);
  blueToothSerial.print("\r\n");
  inputString = "";

    if (ledState == LOW) {
      ledState = HIGH;
    } else {
      ledState = LOW;
    }
  }

  stringComplete = false;
  while (blueToothSerial.available() && stringComplete == false) {
    // get the new byte:

  //    inputString = blueToothSerial.read();
      char inChar = blueToothSerial.read();
   // add it to the inputString:
      inputString += inChar;
   // if the incoming character is a newline, set a flag so the main loop can
   // do something about it:
    if (inChar == '\n') {
      stringComplete = true;
    }
  }

}
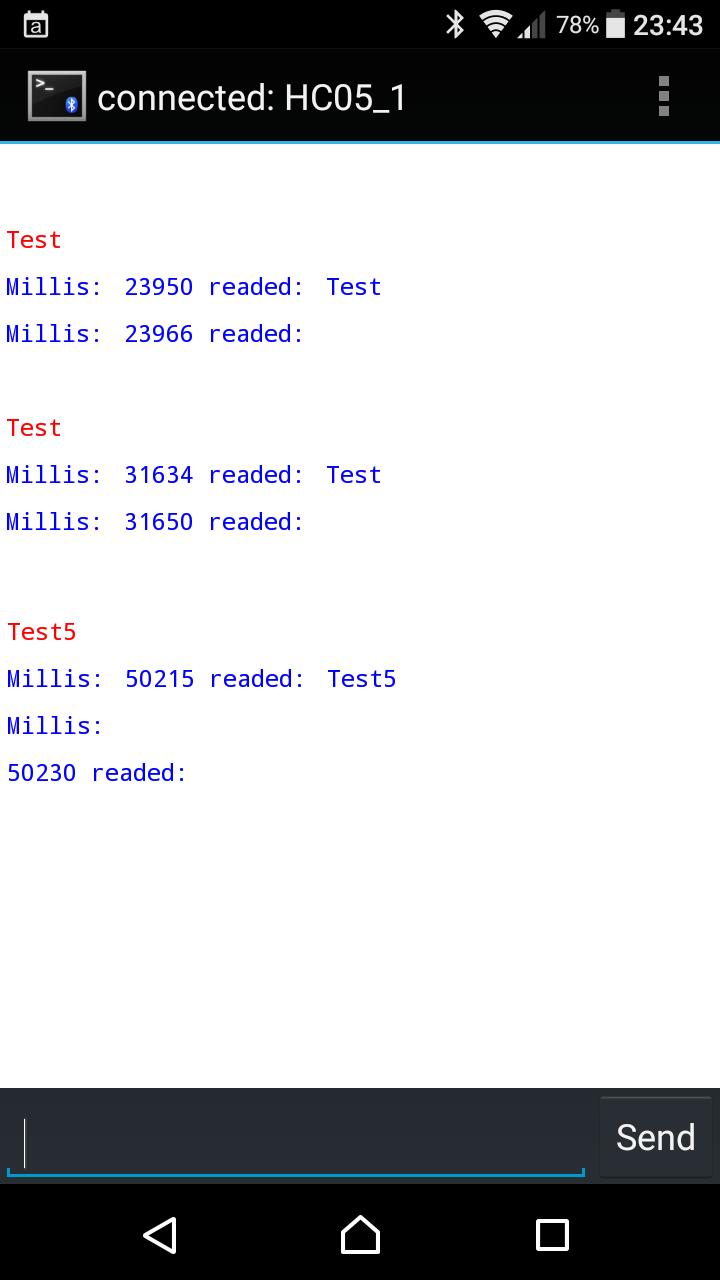
Hier der Testlauf mit der Android APP “Bluetooth Terminal”. Wir sehen die Meldung in rot welche vom Terminal abgesendet wurde und die Meldung in Blau welche der Helvetiny85 über das Bluetooth Modul wieder zurücksendet.
Letzte Aktualisierung: © boxtec internet appliances · the better security products
